Drawing-API
DPG has a low level drawing API that is well suited for primitive drawing, custom widgets or even dynamic drawings.
Drawing commands can be added to containers like drawlist, viewport_drawlist, or a window.
A drawlist item is created by calling
add_drawlist
then items can be added by calling their respective draw commands.
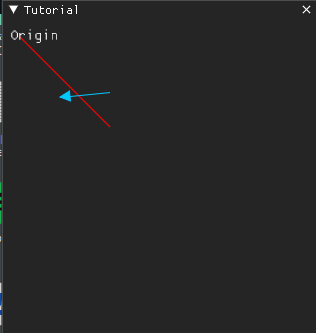
The origin for the drawing is in the top left and the y-axis points down.
The coordinate system is right-handed with the x axis point left, y axis point down, and z axis pointing into the screen.
Code
import dearpygui.dearpygui as dpg

dpg.create_context()

with dpg.window(label="Tutorial"):

    with dpg.drawlist(width=300, height=300):  # or you could use dpg.add_drawlist and set parents manually

        dpg.draw_line((10, 10), (100, 100), color=(255, 0, 0, 255), thickness=1)
        dpg.draw_text((0, 0), "Origin", color=(250, 250, 250, 255), size=15)
        dpg.draw_arrow((50, 70), (100, 65), color=(0, 200, 255), thickness=1, size=10)

dpg.create_viewport(title='Custom Title', width=800, height=600)
dpg.setup_dearpygui()
dpg.show_viewport()
dpg.start_dearpygui()
dpg.destroy_context()
Results
Layers
Drawlists can also contain layers. Layers are an effective way to group drawing items for better control of hiding, Z ordering, etc.
New in 1.1. Layers can be used to assist with some 3D operations. See “3D Operations” section below.
Code
import dearpygui.dearpygui as dpg

dpg.create_context()

def toggle_layer2(sender):
    show_value = dpg.get_value(sender)
    dpg.configure_item("layer2", show=show_value)

with dpg.window(label="Tutorial"):
    dpg.add_checkbox(label="show layer", callback=toggle_layer2, default_value=True)

    with dpg.drawlist(width=300, height=300):

        with dpg.draw_layer():
            dpg.draw_line((10, 10), (100, 100), color=(255, 0, 0, 255), thickness=1)
            dpg.draw_text((0, 0), "Origin", color=(250, 250, 250, 255), size=15)
            dpg.draw_arrow((50, 70), (100, 65), color=(0, 200, 255), thickness=1, size=10)

        with dpg.draw_layer(tag="layer2"):
            dpg.draw_line((10, 60), (100, 160), color=(255, 0, 0, 255), thickness=1)
            dpg.draw_arrow((50, 120), (100, 115), color=(0, 200, 255), thickness=1, size=10)

dpg.create_viewport(title='Custom Title', width=800, height=600)
dpg.setup_dearpygui()
dpg.show_viewport()
dpg.start_dearpygui()
dpg.destroy_context()
Images
Drawlists can display images of types PNG, JPEG, or BMP (See Textures & Images for more detail). Images are added using draw_image.
Using the keywords pmin and pmax we can define the upper left and lower right area of the rectangle that the image will be drawn onto the canvas. The image will scale to fit the specified area.
With keywords uv_min and uv_max we can specify normalized texture coordinates to use just a portion of the area on the image. The default of uv_min = [0,0] and uv_max = [1,1] will display the entire image while uv_min = [0,0] uv_max = [0.5,0.5] will only show the first quarter of the drawing.
To be able to demonstrate these features you must update the directory to that of an image on your computer, such as SpriteMapExample.png.
Code
import dearpygui.dearpygui as dpg

dpg.create_context()

width, height, channels, data = dpg.load_image('SpriteMapExample.png') # 0: width, 1: height, 2: channels, 3: data

with dpg.texture_registry():
    dpg.add_static_texture(width, height, data, tag="image_id")

with dpg.window(label="Tutorial"):

    with dpg.drawlist(width=700, height=700):

        dpg.draw_image("image_id", (0, 400), (200, 600), uv_min=(0, 0), uv_max=(1, 1))
        dpg.draw_image("image_id", (400, 300), (600, 500), uv_min=(0, 0), uv_max=(0.5, 0.5))
        dpg.draw_image("image_id", (0, 0), (300, 300), uv_min=(0, 0), uv_max=(2.5, 2.5))

dpg.create_viewport(title='Custom Title', width=800, height=600)
dpg.setup_dearpygui()
dpg.show_viewport()
dpg.start_dearpygui()
dpg.destroy_context()
Results
Viewport and Window
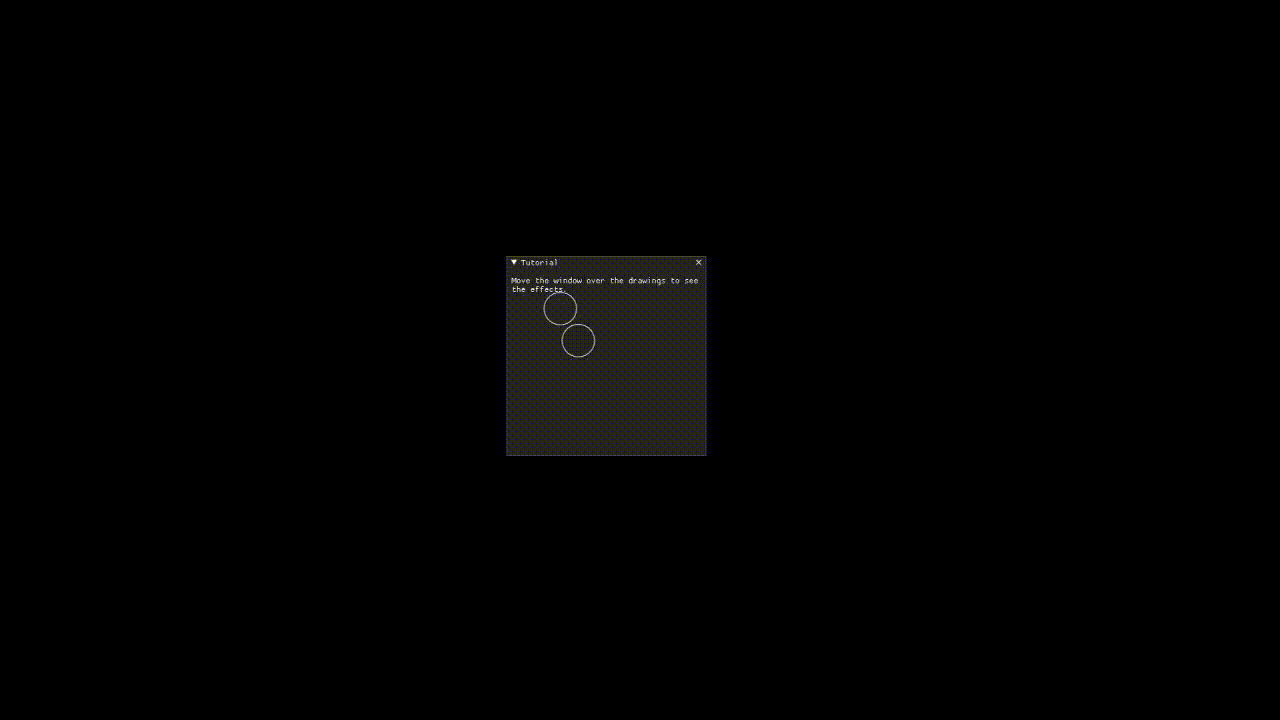
You can also use all the same draw_* drawings commands with a window as the parent. Similarly you can draw to the viewport foreground or background by using a viewport_drawlist.
Code
import dearpygui.dearpygui as dpg

dpg.create_context()

# creating font and back viewport drawlists
with dpg.viewport_drawlist():
    dpg.draw_circle((100, 100), 25, color=(255, 255, 255, 255))

dpg.add_viewport_drawlist(front=False, tag="viewport_back")

dpg.draw_circle((200, 200), 25, color=(255, 255, 255, 255), parent="viewport_back")

with dpg.window(label="Tutorial", width=300, height=300):
    dpg.add_text("Move the window over the drawings to see the effects.", wrap=300)
    dpg.draw_circle((100, 100), 25, color=(255, 255, 255, 255))

dpg.create_viewport(title='Custom Title', width=800, height=600)
dpg.setup_dearpygui()
dpg.show_viewport()
dpg.start_dearpygui()
dpg.destroy_context()
Results
Scene Graph
New in 1.1. For more complex drawing, you can utilize a draw_node item. A draw node is used to associate a transformation matrix with a group of draw items. You can use apply_transform to apply a transformation matrix to a node. This matrix will be used to multiply each child draw item’s points. If a child is another draw node, the matricies will concatenate.
Code
import dearpygui.dearpygui as dpg
import math

dpg.create_context()
dpg.create_viewport()
dpg.setup_dearpygui()

with dpg.window(label="tutorial", width=550, height=550):

    with dpg.drawlist(width=500, height=500):

        with dpg.draw_node(tag="root node"):
            dpg.draw_circle([0, 0], 150, color=[0, 255, 0])                      # inner planet orbit
            dpg.draw_circle([0, 0], 200, color=[0, 255, 255])                    # outer planet orbit
            dpg.draw_circle([0, 0], 15, color=[255, 255, 0], fill=[255, 255, 0]) # sun

            with dpg.draw_node(tag="planet node 1"):
                dpg.draw_circle([0, 0], 10, color=[0, 255, 0], fill=[0, 255, 0]) # inner planet
                dpg.draw_circle([0, 0], 25, color=[255, 0, 255])                 # moon orbit path

                with dpg.draw_node(tag="planet 1, moon node"):
                    dpg.draw_circle([0, 0], 5, color=[255, 0, 255], fill=[255, 0, 255]) # moon

            with dpg.draw_node(tag="planet node 2"):
                dpg.draw_circle([0, 0], 10, color=[0, 255, 255], fill=[0, 255, 255]) # outer planet
                dpg.draw_circle([0, 0], 25, color=[255, 0, 255])                     # moon 1 orbit path
                dpg.draw_circle([0, 0], 45, color=[255, 255, 255])                   # moon 2 orbit path

                with dpg.draw_node(tag="planet 2, moon 1 node"):
                    dpg.draw_circle([0, 0], 5, color=[255, 0, 255], fill=[255, 0, 255]) # moon 1

                with dpg.draw_node(tag="planet 2, moon 2 node"):
                    dpg.draw_circle([0, 0], 5, color=[255, 255, 255], fill=[255, 255, 255]) # moon 2

planet1_distance = 150
planet1_angle = 45.0
planet1_moondistance = 25
planet1_moonangle = 45

planet2_distance = 200
planet2_angle = 0.0
planet2_moon1distance = 25
planet2_moon1angle = 45
planet2_moon2distance = 45
planet2_moon2angle = 120

dpg.apply_transform("root node", dpg.create_translation_matrix([250, 250]))
dpg.apply_transform("planet node 1", dpg.create_rotation_matrix(math.pi*planet1_angle/180.0 , [0, 0, -1])*dpg.create_translation_matrix([planet1_distance, 0]))
dpg.apply_transform("planet 1, moon node", dpg.create_rotation_matrix(math.pi*planet1_moonangle/180.0 , [0, 0, -1])*dpg.create_translation_matrix([planet1_moondistance, 0]))
dpg.apply_transform("planet node 2", dpg.create_rotation_matrix(math.pi*planet2_angle/180.0 , [0, 0, -1])*dpg.create_translation_matrix([planet2_distance, 0]))
dpg.apply_transform("planet 2, moon 1 node", dpg.create_rotation_matrix(math.pi*planet2_moon1distance/180.0 , [0, 0, -1])*dpg.create_translation_matrix([planet2_moon1distance, 0]))
dpg.apply_transform("planet 2, moon 2 node", dpg.create_rotation_matrix(math.pi*planet2_moon2angle/180.0 , [0, 0, -1])*dpg.create_translation_matrix([planet2_moon2distance, 0]))

dpg.show_viewport()
while dpg.is_dearpygui_running():
    dpg.render_dearpygui_frame()

dpg.destroy_context()
3D Operations
New in 1.1. Version 1.1 added 3 new options to layers, perspective_divide, depth_clipping, and cull_mode.
When perspective divide is set to True, the x, y, and z components of each point are divided by the w component after transformation.
When depth clipping is set to True, points will be clipped when they are outside the clip space set using set_clip_space. Setting the clip space will scale and transform points. Scaling is based on normalized coordinates (use perspective or othographic matrices).
Cull mode is used to activate front/back face culling.
Matrices are column major. Post-multiplication is used, for example to scale, then rotate, then transform you use: Transform = Translate * Rotate * Scale.
The following matrix helper functions are provided: - create_rotation_matrix - create_translation_matrix - create_scale_matrix - create_lookat_matrix - create_perspective_matrix - create_orthographic_matrix - create_fps_matrix
Code
import dearpygui.dearpygui as dpg
import math

dpg.create_context()
dpg.create_viewport()
dpg.setup_dearpygui()

size = 5
verticies = [
        [-size, -size, -size],  # 0 near side
        [ size, -size, -size],  # 1
        [-size,  size, -size],  # 2
        [ size,  size, -size],  # 3
        [-size, -size,  size],  # 4 far side
        [ size, -size,  size],  # 5
        [-size,  size,  size],  # 6
        [ size,  size,  size],  # 7
        [-size, -size, -size],  # 8 left side
        [-size,  size, -size],  # 9
        [-size, -size,  size],  # 10
        [-size,  size,  size],  # 11
        [ size, -size, -size],  # 12 right side
        [ size,  size, -size],  # 13
        [ size, -size,  size],  # 14
        [ size,  size,  size],  # 15
        [-size, -size, -size],  # 16 bottom side
        [ size, -size, -size],  # 17
        [-size, -size,  size],  # 18
        [ size, -size,  size],  # 19
        [-size,  size, -size],  # 20 top side
        [ size,  size, -size],  # 21
        [-size,  size,  size],  # 22
        [ size,  size,  size],  # 23
    ]

colors = [
        [255,   0,   0, 150],
        [255, 255,   0, 150],
        [255, 255, 255, 150],
        [255,   0, 255, 150],
        [  0, 255,   0, 150],
        [  0, 255, 255, 150],
        [  0,   0, 255, 150],
        [  0, 125,   0, 150],
        [128,   0,   0, 150],
        [128,  70,   0, 150],
        [128, 255, 255, 150],
        [128,   0, 128, 150]
    ]

with dpg.window(label="tutorial", width=550, height=550):

    with dpg.drawlist(width=500, height=500):

        with dpg.draw_layer(tag="main pass", depth_clipping=True, perspective_divide=True, cull_mode=dpg.mvCullMode_Back):

            with dpg.draw_node(tag="cube"):

                dpg.draw_triangle(verticies[1],  verticies[2],  verticies[0], color=[0,0,0.0],  fill=colors[0])
                dpg.draw_triangle(verticies[1],  verticies[3],  verticies[2], color=[0,0,0.0],  fill=colors[1])
                dpg.draw_triangle(verticies[7],  verticies[5],  verticies[4], color=[0,0,0.0],  fill=colors[2])
                dpg.draw_triangle(verticies[6],  verticies[7],  verticies[4], color=[0,0,0.0],  fill=colors[3])
                dpg.draw_triangle(verticies[9],  verticies[10], verticies[8], color=[0,0,0.0],  fill=colors[4])
                dpg.draw_triangle(verticies[9],  verticies[11], verticies[10], color=[0,0,0.0], fill=colors[5])
                dpg.draw_triangle(verticies[15], verticies[13], verticies[12], color=[0,0,0.0], fill=colors[6])
                dpg.draw_triangle(verticies[14], verticies[15], verticies[12], color=[0,0,0.0], fill=colors[7])
                dpg.draw_triangle(verticies[18], verticies[17], verticies[16], color=[0,0,0.0], fill=colors[8])
                dpg.draw_triangle(verticies[19], verticies[17], verticies[18], color=[0,0,0.0], fill=colors[9])
                dpg.draw_triangle(verticies[21], verticies[23], verticies[20], color=[0,0,0.0], fill=colors[10])
                dpg.draw_triangle(verticies[23], verticies[22], verticies[20], color=[0,0,0.0], fill=colors[11])

x_rot = 10
y_rot = 45
z_rot = 0

view = dpg.create_fps_matrix([0, 0, 50], 0.0, 0.0)
proj = dpg.create_perspective_matrix(math.pi*45.0/180.0, 1.0, 0.1, 100)
model = dpg.create_rotation_matrix(math.pi*x_rot/180.0 , [1, 0, 0])*\
                        dpg.create_rotation_matrix(math.pi*y_rot/180.0 , [0, 1, 0])*\
                        dpg.create_rotation_matrix(math.pi*z_rot/180.0 , [0, 0, 1])

dpg.set_clip_space("main pass", 0, 0, 500, 500, -1.0, 1.0)
dpg.apply_transform("cube", proj*view*model)

dpg.show_viewport()
while dpg.is_dearpygui_running():
    dpg.render_dearpygui_frame()

dpg.destroy_context()
3D Operations Limitations
New in 1.1. The drawing API 3D operations are not hardware accelerated (this will be introduced with DearPy3D). This API is for ‘light’ 3D operations. There are a few issues you may come across while performing 3D operation with the drawing API.
Issue 1: Z ordering
With the current API, users are responsible for correct Z ordering. The recommended way to address this is to use “painter’s algorithm”. Basically, just order the items in proper depth order.
This is not the best solution overall. We would prefer to use proper depth buffering but this requires pixel level control which is not practical with this API.
Issue 2: Perspective Texture Correction
When using draw_image_quad, viewing the image at sharp angles will deform the image. This is due to texture coordinates being linearly interpolated in normalized device coordinate space.
There is currently no practical solution but an attempt could be made to split the quad into several smaller quads. The actual solution requires pixel level control which is not practical with this API.
Issue 3: Culling
Currently, culling is only setup for triangles.
Dear Py3D and Software Renderer
All of the above issues will resolved in Dear Py3D. Before Dear Py3D, we will also be introducing a software renderer for Dear PyGui that will resolve the above issues.