3. Item Usage
3.1. Creating Items
Items are created using their add_*** commands.
All items must have a tag which can either be specified or are automatically generated by DPG.
Tags can be either integers or strings and are used to refer to the item after it has been created.
Items return their tag when they are created.
Warning
Item tags must be unique if specified using the tag keyword. Integers 0-10 are reserved for DPG internal items.
import dearpygui.dearpygui as dpg

dpg.create_context()

with dpg.window(label="Tutorial"):
    b0 = dpg.add_button(label="button 0")
    b1 = dpg.add_button(tag=100, label="Button 1")
    dpg.add_button(tag="Btn2", label="Button 2")

print(b0)
print(b1)
print(dpg.get_item_label("Btn2"))

dpg.create_viewport(title='Custom Title', width=600, height=200)
dpg.setup_dearpygui()
dpg.show_viewport()
dpg.start_dearpygui()
dpg.destroy_context()
Note
Items can be created and delete at runtime see Item Creation
See also
3.2. Creating Containers
Below we will add a window, a group and a child window to the code. Items can either be added directly to the context manager or later by specifying the parent.
import dearpygui.dearpygui as dpg

dpg.create_context()

with dpg.window(label="Tutorial"):
    dpg.add_button(label="Button 1")
    dpg.add_button(label="Button 2")
    with dpg.group():
        dpg.add_button(label="Button 3")
        dpg.add_button(label="Button 4")
        with dpg.group() as group1:
            pass
dpg.add_button(label="Button 6", parent=group1)
dpg.add_button(label="Button 5", parent=group1)

dpg.create_viewport(title='Custom Title', width=600, height=400)
dpg.setup_dearpygui()
dpg.show_viewport()
dpg.start_dearpygui()
dpg.destroy_context()
See also
3.3. Configuration, State, Info
DPG items consist of configuration, state and info. (AND value but we will cover that separately)
Each of these can be accessed by their corresponding function
get_item_configurationkeywords that control its appearance and behavior (label, callback, width, height)
get_item_statekeywords that reflect its interaction (visible, hovered, clicked, etc)
get_item_infokeywords that reflect its information (item type, children, theme, etc)
Note
configuration, state and info are broken into separate commands that access each individual keyword, instead of returning the entire dictionary.
Below we will demonstrate the ways to configure items and how to check their state by viewing them through the item registry tool.
Code:
import dearpygui.dearpygui as dpg

dpg.create_context()

with dpg.window(label="Tutorial"):

    # configuration set when button is created
    dpg.add_button(label="Apply", width=300)

    # user data and callback set any time after button has been created
    btn = dpg.add_button(label="Apply 2")
    dpg.set_item_label(btn, "Button 57")
    dpg.set_item_width(btn, 200)

dpg.show_item_registry()

dpg.create_viewport(title='Custom Title', width=800, height=600)
dpg.setup_dearpygui()
dpg.show_viewport()
dpg.start_dearpygui()
dpg.destroy_context()
See also
3.4. Callbacks
Callbacks give items functionality by assigning a function to run when they are activated and almost all UI Items in DPG can run callbacks.
Functions or methods are assigned as UI item callbacks when
an item is created or at a later runtime using
set_item_callback
Callbacks may have up to 3 arguments in the following order.
- sender:
the id of the UI item that submitted the callback
- app_data:
occasionally UI items will send their own data (ex. file dialog)
- user_data:
any python object you want to send to the function
Note
Because they are optional positional arguments you must use the sender and app_data if you want to use user_data standard keyword arguments
Code:
import dearpygui.dearpygui as dpg

dpg.create_context()

def button_callback(sender, app_data, user_data):
    print(f"sender is: {sender}")
    print(f"app_data is: {app_data}")
    print(f"user_data is: {user_data}")

with dpg.window(label="Tutorial"):
    # user data and callback set when button is created
    dpg.add_button(label="Apply", callback=button_callback, user_data="Some Data")

    # user data and callback set any time after button has been created
    btn = dpg.add_button(label="Apply 2", )
    dpg.set_item_callback(btn, button_callback)
    dpg.set_item_user_data(btn, "Some Extra User Data")

dpg.create_viewport(title='Custom Title', width=800, height=600)
dpg.setup_dearpygui()
dpg.show_viewport()
dpg.start_dearpygui()
dpg.destroy_context()
See also
For more information on the item callbacks Item Callbacks
3.5. Item Values
Almost all UI items have a value which can be accessed or set.
All UI items that have a value also have the default_value parameter which will set the items’ initial starting value.
Values can be accessed using get_value.
Below is an example of setting the default_value for two different items, setting a callback to the items and printing their values.
import dearpygui.dearpygui as dpg

dpg.create_context()

def print_value(sender):
    print(dpg.get_value(sender))

with dpg.window(width=300):
    input_txt1 = dpg.add_input_text()
    # The value for input_text2 will have a starting value
    # of "This is a default value!"
    input_txt2 = dpg.add_input_text(
        label="InputTxt2",
        default_value="This is a default value!",
        callback=print_value
    )

    slider_float1 = dpg.add_slider_float()
    # The slider for slider_float2 will have a starting value
    # of 50.0.
    slider_float2 = dpg.add_slider_float(
        label="SliderFloat2",
        default_value=50.0,
        callback=print_value
    )

    dpg.set_item_callback(input_txt1, print_value)
    dpg.set_item_callback(slider_float1, print_value)

    print(dpg.get_value(input_txt1))
    print(dpg.get_value(input_txt2))
    print(dpg.get_value(slider_float1))
    print(dpg.get_value(slider_float2))

dpg.create_viewport(title='Custom Title', width=800, height=600)
dpg.setup_dearpygui()
dpg.show_viewport()
dpg.start_dearpygui()
dpg.destroy_context()
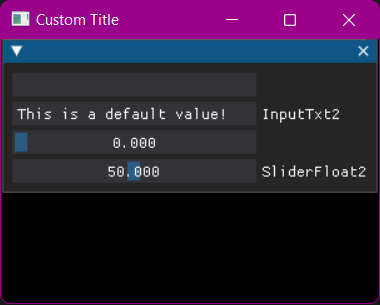
An input item’s value is changed by interacting with it. In the above example, moving slider_float1 slider to 30.55 sets its’ value to 30.55.
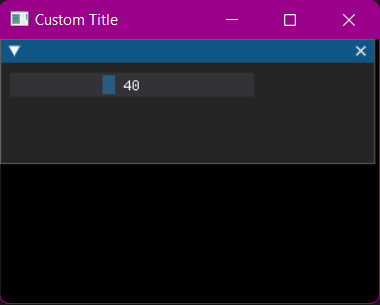
We can set the position of the slider by changing items’ value at runtime using
set_value.
import dearpygui.dearpygui as dpg

dpg.create_context()

with dpg.window(width=300):
    # Creating a slider_int widget and setting the
    # default value to 15.
    dpg.add_slider_int(default_value=15, tag="slider_int")

# On second thought, we're gonna set the value to 40
# instead - for no reason in particular...
dpg.set_value("slider_int", 40)

dpg.create_viewport(title='Custom Title', width=800, height=600)
dpg.setup_dearpygui()
dpg.show_viewport()
dpg.start_dearpygui()
dpg.destroy_context()
Note
The values’ type depends on the widget. (ex.) input_int default value needs to be an integer.
See also
For more information on item values Values
3.6. Using Item Handlers
UI item handlers listen for events (changes in state) related to a UI item then submit a callback.
import dearpygui.dearpygui as dpg

dpg.create_context()

def change_text(sender, app_data):
    dpg.set_value("text item", f"Mouse Button ID: {app_data}")

with dpg.window(width=500, height=300):
    dpg.add_text("Click me with any mouse button", tag="text item")
    with dpg.item_handler_registry(tag="widget handler") as handler:
        dpg.add_item_clicked_handler(callback=change_text)
    dpg.bind_item_handler_registry("text item", "widget handler")

dpg.create_viewport(title='Custom Title', width=800, height=600)
dpg.setup_dearpygui()
dpg.show_viewport()
dpg.start_dearpygui()
dpg.destroy_context()
See also
For more information on item handlers IO, Handlers, State Polling